Showing posts sorted by relevance for query carving. Sort by date Show all posts

Sunday, February 27, 2011

Carvers

We had the occasion to get out and meet some new carvers.  I needed my knives sharpened..and when I bought them they came with Free Sharpening for life at a carving shop over by Lake Ida. Anyone is welcome to the open carving on Thursdays.  It is an hour plus drive for us.  Carvers drive from miles around to get to Larry’s Shop. Years ago we took some classes from Larry.

My knives were a mess, it took Larry quite some time to get a new edge on them.  There is nothing worse than knives that are dull.

I bought a new knife..Dave said I needed it to finish my Duck. ( I found out later that he was a Duck expert.)  Maynard said it was a good idea..he was the carver selling the knives.  It is a push knife and should do the job.

IMG_1369

Dave gave me a new cutout (a reindeer) to try, I have found that carvers are generous people..if they have an extra cutout they share readily.  Both Dave and Maynard are former Wood Carving Instructors.  What a pleasure it was to make new acquaintances.

Maynard was a Chef Instructor before he retired, so naturally I was picking his brain getting some ideas for Far Guy to try..we talked about different ways to prepare fish and seafood.  I don’t know if I am adventurous enough to try scallops or tuna..we finagled  ourselves an invitation to his place..he is also an accomplished chain saw carver and he used to do ice sculptures too.

My knives are all sharpened now, Larry said “Don’t be using these for bark carving anymore.”  I won’t and I made the switch last week to Exacto knives that have replaceable blades for bark carving.

Everyone at the open carving sharpens their own knives.  I encouraged Far Guy to get some equipment, well once the word gets out amongst other carvers..soon an opportunity arose.

IMG_1510

The other morning we drove to the south side of Shell Lake and Far Guy got all set up with a sharpening system.  Tucked back in the woods was a guy who turns wooden bowls and builds custom cabinets and builds pole buildings. The equipment he had for sale was more suited for sharpening carving knives than the huge gouges he uses for turning wood. 

Anyways…I am saving up my good carving knives for a special class I am taking in May. So what will we practice sharpening?  We ordered some blades so that we can make our own carving knives, that should be an adventure.  These will be bark carving knives for me to dull so Far Guy can practice sharpening..yup it is a team effort.

I really didn’t need to add another hobby on top of a hobby..but I have never made a carving knife before..you can let your imagination run wild with some of the beautiful handles.  Perhaps winter should come to an end pretty soon, before I end up with more hobbies:) 

Friday, November 17, 2017

Soap Carving

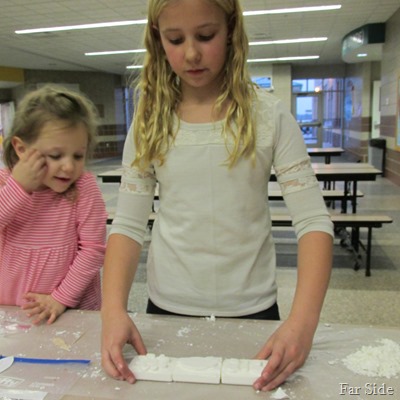
Last summer the carving group taught a soap carving class for the libraries summer art and design program. ( Somehow I  am always the go to person.) Later in the summer I was asked to teach soap carving as part of the Community Education Program.  We taught the class last Tuesday at The Middle School.

I recruited three other carvers to help; Far Guy, Shiela and Dave. It was a fun time!  Several of the participants were our great nieces.

Olivia and Ava soap carving

Our safe carving tools are tooth picks to mark your pattern and small wooden spoons ( the ones that come with individual ice cream containers) shaped to a sharp point.  The simple tools work well with the soap and you would really have to work at cutting off a finger.  Ivory is the soap we use.  Yes it is messy…we covered the tables with wax paper!

Brookes soap carving 

For the class everyone carved a flower step by step and then it was a free for all carving what ever they wanted.  We sent home extra bars of soap and wooden tools.

IMG_2415

I think the children enjoyed themselves!  They learned a new skill and who knows…maybe someday a few will be woodcarvers.

I can carve soap….my hand allowed it…wood not so much.  I hope someday to be back to carving again.  For now I go along to carving and work on some other craft project…the guys always ask me “ how is your bum hand?”  The answer is not good enough to carve yet.  Some things just take time…luckily I have many other hobbies that I can do!

Blog Signature

Tuesday, August 3, 2010

Bark Carving

Far Guy and I have been taking a class on Bark Carving.  The bark of a Cottonwood tree is very thick and suitable for carving.   It has been an adventure.
 Beginnings..can you see a house?  Probably not..me neither..I had to look really, really hard.
 Ah ..finally it looks like a house. This is Cottonwood bark from South Dakota.
 I had a real problem with my roof ( It kept breaking off) so it became a multi level roof.

For once I was able to carve a whole project without cutting or stabbing myself with the knife. Success!
We have taken a few carving classes before,  I almost always get discouraged and my carving ends up unfinished.  I have a duck, a Santa, and a merry go round horse that remain unfinished.. I do much better with carving projects that are individual interpretations instead of trying to make an exact copy.  I try to look at the wood and let it speak to me..most instructors are real put off by such an "individual attitude"..some look at you like you are nuts, anyone can do an exact replica with the right instructor..well except for me..I am always taking too much wood off in the wrong spots, I guess I have always been marching to a different drummer..

I took a photo of all the carvings..each one is different.

Now for a carving story:  I have very little fingerprint left on my index finger on my left hand. Listen up girls, just in case you need to ever identify my body and you aren't sure it is me..look for the non fingerprint. Anyway I was carving one day and sliced it off, yup part of the tip of my finger was laying there on the floor..Far Guy tended to me and got the bleeding stopped..it was really painful. My carving companions rescued my finger tip off of the floor just in case I wanted to have it sewed back on..thoughtful carvers.   Far Guy  wrapped it all up, I had a hard time looking at it.  The next day I just left it covered, finally the second day I decided that I should look at it possibly while laying down so I wouldn't faint...low and behold, I could not get the bandage off.  Far Guy had used gauze and it had grown into my finger..I could not get it to budge..I soaked it for a couple of hours..it still wasn't letting loose.  There was nothing to be done ( well I suppose I could have just kept the bandage in place the rest of my life)  except suck it up while laying on the couch and let Far Guy rip it off...owwie..since then I wear a steel mesh glove on my left hand..just in case..I have found that cuts are less severe with the gloves..however stabbings can still be a problem:)

Tuesday, April 3, 2018

Letting the wood speak

When I carve with Cottonwood Bark I let the wood speak to me.  I have carved many little houses and no two are exactly alike.  That is because no two pieces of bark are alike.

Bark is easy on my arthritic hands and my recovering carpal tunnel problem.  I had a bunch of houses on the table to paint when I decided to show you all what the carving process is like.

First I look in my bag and get out a piece of wood.

carving blank

Here is a blank…I saw a pillar in the front, a door with a window and a chimney, on the other side I saw a tree.

I mapped it out so you could see it.

Carving mapped out

See the P in the front?  The C is a chimney and there is a door with a window.

chimney and roofline

Then I began to carve out the chimney and made the roofline.

carving the pillar

The pillar is always a bit difficult…sometimes you need a bit of glue to strengthen part of the pillar. You have to carve behind the pillar and remove lots of wood.

almost done

Almost done, the door is a bit big but I had room to make a nice window.  Later I will drill out the window and file it to the right shape.

Here is the tree and I had room for a funny shaped window…there are no rules that must be followed in bark carving.

window and tree

The tree will look more like a tree when it is painted and my second thought was the window is in the chimney…oh well maybe is is just in a little room around the chimney area!

carving complete

Before                                                   After

carving blankcarving complete

That is pretty much what I saw in this piece of wood.

Hope you enjoyed seeing my carving process.

Blog Signature

Tuesday, July 11, 2017

Carving with kids

Last spring the carving group that I carve with asked me to facilitate an event.  They would “help” but did not want to be in charge.

It was a one hour program that should appeal to young potential carvers ages 8 and older.  It was part of an Art and Design Summer program sponsored by the Library.

Carving as art is hard to teach to a group of wiggly giggly kids.

We decided to have a display and let them see what we had carved out of wood and to let them carve Ivory soap.

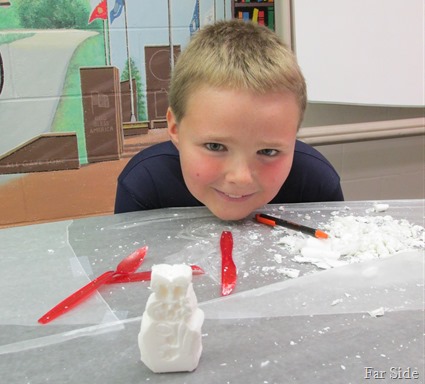
I collected patterns, soap and fashioned some tools that would work to carve soap. A whole package of plastic silverware was modified.  Parts were cut off and smoothed out to make various knives, scoops and pointy cutters.  Far Guy buffed them all so the edges were not overly sharp…they would really have to work at it to draw blood.

Soap carving group

20 kids signed up and 17 showed up.  Good thing I had many helpers.

Canoe Soap Carving

This little girl carved a canoe.

Flower Soap Carving

A flower

Star Carver

And the star pupil of the day carved a snow bunny!  He asked me to take his photo with his carvings and his carving tools.

I covered their work spaces with wax paper, one little boy kept moving down the table to a clean spot.   Another little boy told me he was an artist and could do a complicated carving and he would need no help from me.  ( He was a turd.)

The girls carved hearts, flowers and lady bugs.  The boys mostly turtles and the snow bunny and a dog/whale/fish…it kept changing.

Most of the adult carvers made the rounds encouraging and offering assistance and they all helped me clean up…cause there was soap pretty much everywhere.

It was a good afternoon.

Dr Bill brought a First Aid Kit just in case, he also offered to give them real knives…which I kindly declined.

Blog Signature


Friday, May 25, 2012

Woodcarving: Walter

Earlier this month I took a three day carving class by a world famous instructor.  I have always wanted to go to one of his classes.  Usually his classes have a fee of 250 dollars.  Our carving group along with another carving group submitted a grant and we got the funding..the cost of the class was reduced to 40 dollars.

IMG_1199

I have books by the carving instructor ( word instructor used loosely.)  I was really looking forward to the class.  Far Guy covered for me at work so I could go.

The instructor lectured for awhile..he taught even less.  He left us all to carve whatever we wanted..there was no instruction..no hold your knife this way and make this cut..then do this next.  I wanted step by step instruction.

The people in the class pretty much helped each other out like we usually do. I was really disappointed.  I really needed help with my right and lefts..I have trouble getting both sides of a carving to look alike. It is a visual thing..and it is something I struggle with.

After three days I have a carving.  It still needs work.

Walter

Meet Walter..in progress.  He needs some eyes and maybe a touch of sandpaper here and there and paint.

IMG_1447

These are caricatures..they are supposed to look a little funny and bring a smile to your face.  Is he worth 40 bucks ..maybe..he certainly isn’t worth a 250 class fee. I didn’t buy any more of this guys books, or his knives or his wood blanks to carve more figures.   Sometimes I think these fancy smancy instructors are just in the classroom to sell their wares instead of teaching their craft.

In a week or so we will begin a new bark carving class..I am looking forward to it. It is supposed to be a large bark project that is carved in halves and then glued together..I think they call it bark in the round:)

Blog Signature

Tuesday, January 24, 2017

Woodcarving: Santa

Years ago, probably about 10 years ago some of my relatives ( Aunt Anna, Chuckie and Kathy) got together to carve a Santa.  The inspiration was a ceramic Santa that belonged to my Aunt Anna.  Someone scanned it so we all had copies of how it should look plus when we got together to carve we could look at the inspiration in person. Everyone finished theirs…except me. Luckily I kept the scans.

My carving has been in and out of my carving bag, for awhile it was hidden upstairs in a very large tin of unfinished carvings.  If finally found it’s way back into my bag during one of the carving sorts…there is “stuff” in that tin that should be finished or burned.

Santa Carving

I worked on it before Christmas (ever optomistic that I would finish it before Christmas but that didn’t happen) yesterday I smoothed out some rough parts. He carries a tree in one hand and holds the bag slung over his shoulder in the other.  I hope to help that area between bag and beard when it is painted… it was one area that I really struggled with.Santa Carving two

Back of Santa

His bag looks more like a backpack, I suppose I could fix that but I have declared it DONE and ready for gesso and paint. When his is painted I will share the finished carving…just another of my ongoing projects.

I have been woodcarving for about 13 years now.  I have learned so much over the years and I think my carving skills have improved.

Blog Signature

Monday, August 23, 2010

Cousin Chuckie: Self Taught Carver

Chuckie the Carver

My cousin Chuckie is a self taught carver.  He learned to carve with a carpet knife on his noon hour.  This weekend he volunteered his time as a demonstrator at the Lake Itasca  Pioneer Farmers Show.  We stopped by on Friday to say Hi.

Chuckies Carvings Chuckie is a very talented carver and wood burner.  All of these birds have been carved and each individual  feather is wood burned before they are painted..some are just carved and wood burned..the feathers are real works of art.

IMG_6648 We see Chuckie at carving in town. He is always available to answer questions and to give suggestions.  His carving group is quite active, and Far Guy and I have decided to join them once a week when we can.  So to make a long story short we are keeping company with people who have very sharp knives!   It seems like a real friendly group, mainly men, but there are a few women.

I have an unfinished duck and an unfinished Santa that I should do something with..something as in finish or burn in the wood stove. Far Guy and I both have unfinished Carousel Horses from a class we took a long time ago. We have lots of projects to keep us busy with this group for the winter. 

Another of the reasons we decided to join the carving group is the Christmas Ornament that Far Guy designed for 2010. It is a carving. If we go every week between now and Christmas we will have it in the bag!  We need to carve about 60 ornaments…we have 12 done…well not done done..but carved.  When we get them all done I will share photos.  We have been working on them during the day either in Far Guys garage or in his greenhouse, the heat has been keeping us out of there lately and into the shade of the garage. Wood Carving is a very messy hobby, soon enough we will have to carve indoors, but for now it is an outside activity. 

Carving is a quiet activity, you can hear the Loons down on the lake, and the Chipmunks with an attitude Chirping at Chance, and the sound of a ball being deposited into the carving bag that sits on the floor between us:)

Tuesday, January 19, 2016

A Bark Carving Finished

I took a class in 2012 to make a larger bark carving.  It was two pieces of bark glued together with hot glue.  The idea was to carve it and then heat it in the microwave and the hot glue would get mushy and you could separate the pieces to drill out some of your windows…doors whatever you carved…then the two pieces could be permanently glued together.
Alrighty then!
June 4 2012 Hunk of wood
June 2012
Got a vision yet?   Neither did I but sometimes you have to let the wood talk to you.  Although sometimes I think it is speaking a foreign language.
June 11 2012 Carving
I saw a tree and a house and a chimney…maybe.
Bark Carving three 2012
June 2012 Making progress!
Then the class ended and I carted that piece of wood around in my carving bag for a long time…I would pick it, up carve something off of it and shove it back in my bag.

I finally got it far enough along to separate it…well the doggone thing warped…I left it out in the greenhouse/woodshop…I nearly threw it away.  One day last summer I picked it up and got the pieces to meet together somewhat close enough.
Bark Carving ready to paint january 2016
It is not perfect but sometimes you just have to go with the flow. I worked on it a little more and declared it ready to paint.
Tree side
The tree side.  January 18, 2016
Hut side
The hut side.  Here you can clearly see where it was two pieces at one time.

Cross one unfinished project off the list!  For now I put it up on the mantle, I have to remember to take it to carving next week to show it off..otherwise those guys think I never finish anything…I do, it just took me three years and seven months.  This is not my oldest project…I have others that may or may not be unearthed.
Blog Signature

Tuesday, September 13, 2016

Carving Inspiration

After finishing up the Christmas Ornaments I was faced with the dilema …what to carve next?  During our weekly carving get togethers one of the gals was carving a daisy.  I asked her if she would like to teach a few of us the technique…she said “Sure.”  She is a very talented woodcarver…she graduated from high school with Far Guy.

She took the time to make study pieces….step by step carvings that help you to carve a piece along with very detailed instructions. Far Guy cut out a few round pieces of basswood.  Bit by bit we learned how. In my case it is a good thing that no two daisies are alike!  I struggle with transposing the position of the petal on top and what parts are over or under to the bottom of the petal…it must be a right brain left brain thing so I usually end up guessing!

Carving

The one on the right is pretty much done and the one on the left is in progress.

Carvin Dasies two

I woodburned a design on the underside of the daisy…a stem will be attached…and these five will someday be a bouquet.  SOMEDAY.

Ox Eye daisy (2)

I would like to carve one more project before Christmas ( a gift) and I would like to do the  prototype of next years ornament before we are forced to carve inside because it will get cold on the patio!

My carving skills are improving.  I began carving in the winter of 2004 at my Uncle Otto and Aunt Marie’s dining room table.  Uncle Otto took Far Guy, Cousin Kathy and I under his wing and taught us the basics.  Uncle Otto died on September 13 2004 his 68th birthday. After he died we didn’t carve for a long time…but eventually we all began to carve again.  I think he would be pleased with how far his students have come.

Blog Signature